Do you do just mouldings?
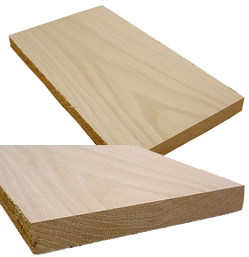
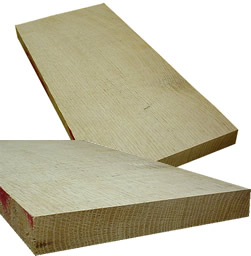
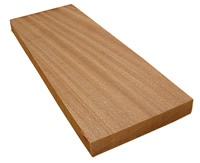
The majority of our work is interior mouldings, whether it is a standard or custom profile. We produce picture frame mouldings. We also produce hardwood boards, custom hard maple butcher blocks and cutting boards.
Do you manufacture custom cabinets?
No. We can recommend several excellent cabinet makers in your area!
Why choose us, Millcreek Moulding & Millwork, over a big box store?
We inspect before YOU buy. Common problems we pay attention to: Chatter marks or zebra stripes created from poorly set-up machines; Snipe or gouge cuts near the end of the moulding. Although you may find a natural knot here and there, we make sure what you buy is entirely usable. You receive what you order, plus. This means you will not be forced to cut off split or gouged moulding ends before you start your project. This will also save you time (money) not having to pick through their limited supply of mouldings. We try to give you custom lengths to minimize your waste. We will match your existing profile the others don't carry. We offer free delivery to most areas and will deliver to your job site.
Are there samples I can look at?
We can show you a variety of mouldings samples. You may keep these samples to help you discuss your moulding project with family and friends.
Can I “stack” stock mouldings for a custom look?
Absolutely. Custom-built hardwood mouldings can be expensive, but chances are you can get the custom look you want on a modest budget. The standard width of trim is five inches. By combining moulding profiles and shapes, it’s easy to build up or “stack” standard profiles to create the effect of a single piece of wood several inches wider in virtually any style.
How can I combine stock pieces of wood to create a baseboard?
Many baseboards, especially those in new homes, can use some sprucing up. Visit my Base Moulding links to find at least two pieces of stock hardwood that, together, can create the look you want. For a traditional baseboard, start from the floor with a relatively flat trim board that is four to six inches high. Add a piece of trim moulding with a convex or rounded shape (such as a basic quarter-round) at the bottom of the flat trim board. Then top off the flat board with a recessed profile. Ask us for something custom. The finished product should measure six to eight inches high.
What type of wood moulding should I choose?
Nothing stands up to wear and tear better than naturally beautiful American hardwood. That’s why woods like oak and maple are the best choice for window and door casings and anything else likely to be bumped, such as baseboards and chair rails. To make sure the trim you choose is solid, check to see if the grain pattern on the face of the product continues over the ends and sides. When budget is an issue, it’s possible to get the look of a more expensive hardwood, cherry for instance, by using a cherry stain on a less expensive hardwood. This technique works especially well in decorative applications above eye-level – crown mouldings and recessed ceiling patterns, for instance.
How much of the wall should wainscoting cover?
Wainscoting traditionally is made of individual tongue-and-groove solid hardwood boards. It typically is either the height of a chair rail (running along the bottom third of the wall) or the height of a plate rail (covering the bottom two-thirds of the wall.) In a room with eight- to nine-foot-high ceilings, wainscoting at chair-rail height typically falls 32 to 36 inches up the wall. For higher wainscoting, at least 60 inches is usually best. To pick your spot, consider dividing the height of your room by three and drawing a line at the point you find most visually appealing.
How can I dress up my fireplace mantel?
The fireplace tends to be the focal point of a room so enhancing it with hardwood mouldings, wainscoting or paneling is well worth the effort. If your mantel features decorative details, choose wall mouldings to complement that look. Moulding strips will create the look of raised paneling. Use decorative hardwood medallions and other ornamental period-style mouldings to add visual interest to a plain mantel face. Stain trim the same color as the mantel or gild or paint it as an accent. Consider extending the design elements to include built-in seating, bookcases or cabinets. When budget is a concern, transform a drab fireplace wall with a simple wood plank mantel, supported by antique-looking wood brackets.
Can I install my own trim?
Maybe. A handy homeowner with basic carpentry skills typically can tackle a simple moulding installation project. The job requires the ability to use a miter box and a coping saw. When possible, try to buy several short pieces of moulding rather than one big piece for a long stretch of wall. When stacking mouldings, completely install the first piece for the whole project. Then add the second piece before the third, and so on.
What about moisture content in my mouldings?
Add Moisture to wood and it will expand. Decrease moisture in wood and it will shrink. Wood expands and contracts mostly across the face or width of the board, less in the thickness, and minimally in the length. These simple properties of wood need to be considered in the storage, use and handling of mouldings.
Special care is taken to produce mouldings with a moisture content of 6 - 8 percent. The reason for that moisture percentage is that at 70 degrees and a humidity of 25 – 30 percent (an average between summer and winter temps and humidity), wood will naturally reach an equilibrium moisture content of 6 – 8 percent. Place wood in an environment that is more humid than this and it will expand. If later it is subjected to drier conditions, it will shrink. This dimensional change can be problematic if you fit parts together while they are expanded and later, in drier conditions, the fit is no longer acceptable. You may have seen miter joints in casing that have a space between the two joined ends. If it had been properly fit during installation, it means the moulding had too high a moisture content when installed. This could have been the result of the lumber being too wet when the mouldings were manufactured (THIS DOES NOT HAPPEN AT MILLCREEK MOULDING & MILLWORK), or, the moulding may have taken on moisture after being made. In new construction, a home’s interior is very humid due to the concrete, lumber and drywall all drying out. If unfinished mouldings are stored in the home during a high humidity period for an extended period (say 2 weeks) they will take on moisture. The worst scenario in new construction might be if mouldings were stored on a freshly poured concrete floor. The mouldings will pick up moisture and expand. During the heating season, the mouldings will dry and shrink noticeably. Putting a sealer or varnish on mouldings will reduce the amount of moisture the wood will absorb. Sealing the wood on one side only though will still allow moisture absorption on the unfinished side, which in turn, will cause the unfinished side of the board to expand, forcing the board to cup. The lesson is to seal both sides of the wood.
The objective is to bring the moisture content of wood, as close as possible, to the level the finished product will experience in service. Acquire your lumber in advance and give it time to acclimate to the environment in which it will be used or worked. Sometimes it may be necessary to “stack and sticker” lumber to allow it to properly reach equilibrium with the environment.
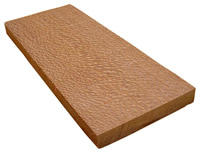
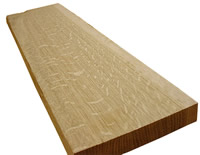
Finished projects will continue to absorb or give off moisture with changes in humidity and temperature of the surrounding air. The wood will always undergo changes in moisture content and dimension. Consequently doors and drawers may stick during periods of high humidity. Moulding joints may open. Solid wood panels in raised panel doors may shrink exposing unfinished wood along the edges of the frame. Furniture moved from one part of the world to another may change enough in dimension that it must be reworked to function correctly. And, during a dry night a poorly designed furniture panel may explode with a bang!Wood technologists refer to flat sawn lumber as “tangential”. The saw blade cuts a kerf on a line tangent to the annual growth rings. Quarter sawn lumber is “radial”. The saw blade cuts a kerf from the pith across the annual growth rings. Lumber is seldom completely tangential or radial but ever changing throughput the cutting process. Look at the end of a board; if the angle of the rings to the face is 0 to 30 degrees the board is flat sawn; if the angle is 60 to 90 degrees the board is quarter sawn. In between, 30 to 60 degrees, is bastard or rift sawn. Flat sawn lumber has tapered cathedral grain, while quarter sawn lumber has long straight grain lines.
|
Some species-White Oak, Lacewood, Sycamore etc.- have large rays that are exposed when quarter sawn producing a dramatic pattern. Similarly, woods with interlocked grain-Sapele, African Mahogany etc. - produce a striped ribbon effect when quarter sawn.
|
Movement across the grain is greatly influenced by how a board was sawn. On average flat sawn hardwood will shrink 8% from the Fiber Saturation Point to oven dry while quarter sawn hardwood will shrink only 4%. There are tables for tangential and radial shrinkage by species but for most applications knowing that quarter sawn lumber moves only half as much as flat sawn is sufficient.
On some projects the orientation of the cut will make a difference but for most applications either flat sawn or quarter sawn is satisfactory. Here are some characteristics of each:
| Flat sawn |
Quarter sawn |
|
Shrinks and swells less in thickness |
Shrinks and swells less in width |
|
Grain presents a cathedral pattern. Figure patterns resulting from annual rings and are displayed more conspicuously |
Grain presents a pattern of long straight lines. Raised grain caused by separation in annual rings is not as pronounced. |
|
Knots are round or oval; boards with round or oval knots are stronger than boards with spike knots |
Knots are spike shaped; boards with spiked knots are weaker than boards with round or oval knots |
|
Is less susceptible to collapse in drying |
Cups, surface-checks, and splits less in seasoning and in use |
|
Shakes and pitch pockets, when present, extend through fewer boards |
Does not allow liquids to pass through readily in some species |
|
|
Holds paint better in some species |
|
Standard sawing pattern for most species. Generally available |
Commercially sawn in only a few species. May be difficult to obtain |
|
Less costly |
More costly |